
A caulk line often fails quietly. It may look smooth and firmly attached when you finish the job, but days or months later, a thin opening appears along one edge. At first, it might seem like nothing more than an untidy line. However, that small separation can allow water, air, dirt, or insects to pass through the joint the caulk was supposed to protect. Covering it with another layer may hide the opening briefly, but it will not stop the problem from returning.
The strange part is that the caulk may remain firmly attached to one surface while completely releasing from the other. Why would the same product bond successfully on one side and fail on the opposite side? The answer is usually found in the surface preparation, the materials being joined, the movement of the joint, or the conditions in which the caulk was applied. Sometimes an invisible layer of old silicone is responsible. In other cases, moisture is hiding beneath the surface, the selected caulk cannot bond to one of the materials, or the joint moves more than the bead can tolerate.
A lasting repair begins with identifying the actual cause instead of simply applying more caulk. In the following sections, we will examine seven common reasons caulk pulls away from one side. You will learn how leftover residue and contaminated surfaces weaken adhesion, why compatibility matters, how movement affects the seal, and what happens when the bead has the wrong size or shape. We will also look at hidden moisture and premature water exposure, then explain the appropriate fix for each problem so your next caulk line has a better chance of staying attached.
Let’s dive in, identify what is causing the separation, and find the right fix for each problem.
- Old Caulk Residue Is Blocking the Bond
- The Surface Was Wet, Dirty, or Contaminated
- The Caulk Is Incompatible With One Surface
- Movement Is Pulling the Joint Apart
- The Caulk Bead Has the Wrong Size or Shape
- Hidden Moisture Is Weakening the Seal
- The Caulk Got Wet Before It Fully Cured
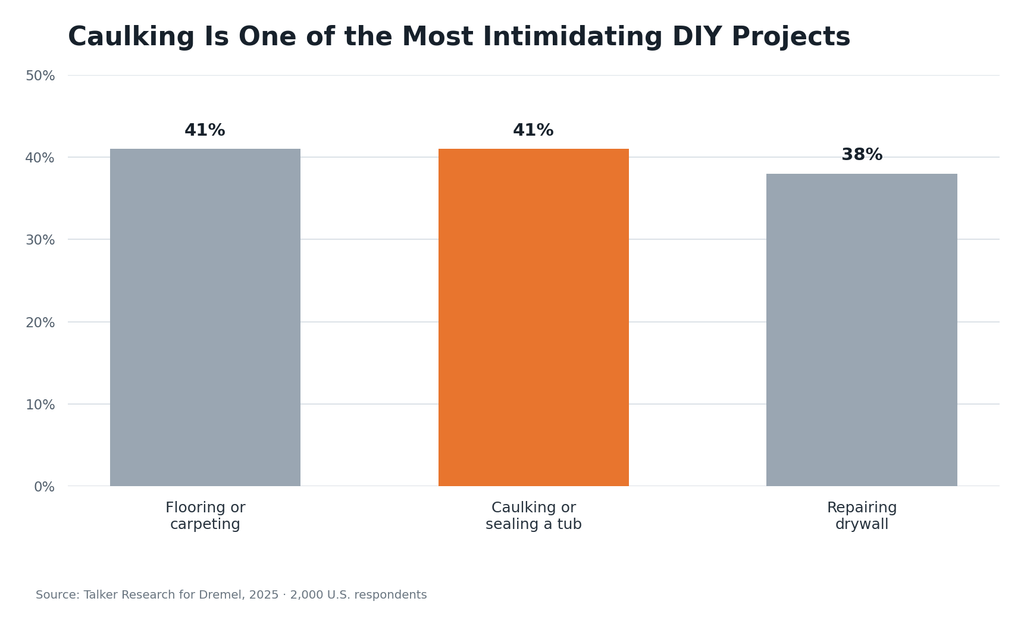
The graph does not mean that 41% of people failed at caulking. Instead, it shows how many respondents felt intimidated by the project. A tube of caulk may be inexpensive and easy to find, but creating a durable seal requires more than squeezing material into a gap. The surfaces must be properly prepared, the product must suit both materials, and the bead must be applied under suitable conditions.
This helps explain why a caulk line can look smooth immediately after application yet begin separating later. When it pulls away from only one side, the problem normally involves adhesion between the caulk and that particular surface. Finding the cause is therefore more important than simply placing another bead over the opening.
Even after the old bead is removed, an almost invisible silicone film can remain. New silicone may fail to bond securely to this residue, causing it to separate from one edge..
1. Old silicone residue prevents adhesion
Even after the old bead is removed, an almost invisible silicone film can remain. New silicone may fail to bond securely to this residue, causing it to separate from one edge.
HOW TO FIX : Mechanically remove the old material with a surface-safe scraper, then clean the surface using a cleaner approved by the new sealant manufacturer.
2.The surface was wet, dirty, or contaminated
Trapped water, soap residue, grease, dust and cleaning-product residue can prevent the caulk from bonding. This is particularly important around bathtubs and showers.
HOW TO FIX : Clean the joint carefully and allow it to dry completely before applying the new product. Never cover an actively wet joint.
3. The caulk is incompatible with one surface
A product may adhere well to tile but poorly to an acrylic tub surround, plastic, fiberglass, painted material or another smooth surface. This explains why a bead sometimes remains attached to one side while releasing from the other.
HOW TO FIX : Identify both surfaces and select a sealant whose label or technical data sheet specifically lists those materials. Use primer if the manufacturer requires it..
4. One of the surfaces flexes or moves
Acrylic tub surrounds and bathtubs can move under a person’s weight. Temperature changes, humidity and normal building movement can also stress the joint. The caulk may detach from whichever side provides the weaker bond.
HOW TO FIX : Use a sealant with sufficient movement capability and stabilize loose materials. Some professionals fill a bathtub during application, but this must be verified for the particular tub and sealant..
5. The bead has the wrong size or shape
An extremely narrow bead may not contact enough of both surfaces. A very large bead can become difficult to tool and cure correctly. Excessive tooling can also remove too much material from the joint.
HOW TO FIX :Match the nozzle opening and bead dimensions to the joint. Apply enough sealant to contact both sides, then tool it with controlled pressure.
6. Moisture is entering from behind the joint
Water can travel through damaged grout, an unsealed area or failed waterproofing and reach the back of the caulk. Persistent moisture may weaken adhesion and encourage mold. Replacing only the visible bead will not solve this problem.
HOW TO FIX : Investigate where the water originates. Repair leaking plumbing, loose tile, deteriorated grout or failed waterproofing before resealing.
7. The caulk became wet before it cured
A bead can feel dry on the surface while remaining uncured underneath. Using the shower too early may interfere with adhesion or weaken the seal.
HOW TO FIX : Follow the exact water-ready and full-cure times printed on the cartridge. These times differ substantially between products.
A durable caulk line depends more on preparation than appearance. Take the time to identify and correct the real cause of the failure, and your next seal will have a much better chance of staying firmly attached and protecting the joint for years.
Have you experienced caulk pulling away from one side, or have you discovered another cause or solution that worked for you? Share your experience in the comments below. Your insight may help another homeowner solve the same frustrating problem.
Sources and Further Reading
This article was prepared using information from reputable research and manufacturer resources. The following references provide additional guidance about caulk adhesion, surface preparation, application, and curing:
- Talker Research: DIY Projects Give Millennials and Gen Z Joy and Confidence. This 2025 survey of 2,000 Gen Z and millennial homeowners and renters in the United States found that 41% considered caulking or sealing a bathtub an intimidating DIY project.
- Sashco: Adhesive Failure—How to Fix Splits and Tears in Caulk. This resource explains why caulk loses adhesion, pulls away from a surface, or fails because of contamination and incompatible materials.
- Sherwin-Williams: Caulk Failure. This guide covers common causes of caulk failure, including poor surface preparation, loss of flexibility, and excessive joint movement.
- DAP: A Simple Guide to Perfectly Caulking Your Shower or Tub. This step-by-step guide explains how to remove old caulk, clean and dry the surface, apply a controlled bead, and allow sufficient curing time.